To do bodyweight heel taps, lie on your back with knees bent, keep your low back gently pressed to the floor, then reach side to side and tap each heel. It targets the abdominals and obliques while keeping the movement small and controlled. The most common mistake is letting the ribs pop up or the low back arch; fix it by exhaling and keeping your ribs down as you reach. Progress by adding reps, slowing the tempo, or increasing reach distance as long as your back stays quiet.
Step-by-step form
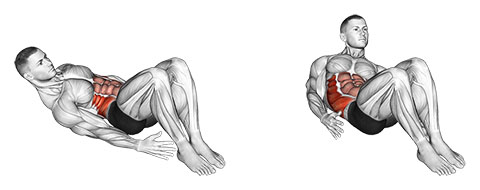
- Set up: Lie on your back with knees bent and feet hip-width.
- Brace: Exhale and gently press your low back into the floor.
- Initiate: Lift shoulder blades slightly and reach for one heel.
- Main rep path: Tap the heel, then reach to the other side.
- Hardest point: Keep ribs down and neck relaxed as you switch.
- Finish: Move side to side in a smooth, steady rhythm.
- Reset: Set your ribs and low back before the next set.
Who this variation is for
This is a simple core move for beginners who want an ab and oblique exercise without equipment. Skip it if back discomfort shows up even with a small range.
- Best fit: Beginners building core control and endurance
- Not ideal when: Low back pain increases during the reach
- Better option if not ideal: Dead bugs or floor crunches
Setup and equipment
The key is keeping your low back quiet. Small range is fine.
- Setup position: Knees bent, feet planted, ribs down
- Equipment setup checks: Clear floor space and comfortable surface
- Start load/resistance: Bodyweight only
- Bracing and breathing plan: Exhale on each reach, inhale as you return
Muscles worked and movement pattern
This is a side-to-side trunk flexion pattern. You should feel the abs and obliques, not your hip flexors.
| Role | Muscles |
|---|---|
| Primary | Abdominals |
| Secondary | Obliques |
| Stabilizers | Hip flexors, lower back |
At a glance
- Variation: Bodyweight
- Best for: Core endurance and control
- Primary muscles: Abdominals
- Equipment: None
- Difficulty: Beginner
- Primary goal: Core endurance
How to check your form
- Low back stays gently pressed into the floor.
- Ribs stay down as you reach.
- Neck stays relaxed, chin slightly tucked.
- Reaches are smooth, not rushed.
Beginner mistakes and quick fixes
| Mistake | Why It Happens | Fix |
|---|---|---|
| Low back arches | Reaching too far or rushing | Shorten the reach and exhale on each tap. |
| Neck tenses up | Head lifted too high | Keep shoulder blades low and relax the neck. |
| Feet shift around | Core brace is loose | Press feet into the floor and slow down. |
What you should feel
- At the start of each rep: Ribs down and abs braced.
- During lowering or lengthening: Control stays in the abs.
- During the hardest point: Obliques working on the reach side.
- At lockout or finish: Low back still relaxed and supported.
- If you feel joint pain: Shorten the reach and reset your brace.
Regressions (Easier Versions)
- Small-range heel taps with hands on the floor for support.
- Dead bugs when you need more back support.
Progressions (Harder Versions)
- Slow the tempo to a 3-second reach each side.
- Lift feet slightly to reduce support once form is solid.
Alternatives by Equipment
| Alternative | When to use it | Why it helps |
|---|---|---|
| Dead bug | When back needs more support | Keeps ribs down and core braced |
| Floor crunch | When you want straight-up ab work | Simple setup and clear range |
| Side plank | When you want more oblique focus | Builds lateral core strength |
How many sets and reps for beginners
Start with short sets and smooth reps. Train core 2-4 times per week with rest between harder days.
For Strength
- Sets: 2-4
- Reps: 8-12 per side
- Rest: 45-75 sec
- Frequency: 2-3x/week
- Progression rule: Add reps first, then increase reach.
For Muscle Growth
- Sets: 2-4
- Reps: 12-20 per side
- Rest: 45-75 sec
- Frequency: 2-4x/week
- Progression rule: Add reps, then slow the tempo.
For Skill / Return to Training
- Sets: 2-3
- Reps: 8-12 per side
- Rest: 45-75 sec
- Frequency: 2-3x/week
- Progression rule: Keep ribs down before increasing range.
4-week example progression
| Week | Sets x reps | Load or difficulty target | Goal |
|---|---|---|---|
| 1 | 2 x 12/side | Small range | Learn the brace |
| 2 | 3 x 12/side | Same range | Smooth, even reps |
| 3 | 3 x 15/side | Same range | Build endurance |
| 4 | 3 x 15/side | Slower tempo | More control |
Checklist before your first set
- Low back can stay in contact with the floor.
- You can exhale and keep ribs down.
- Reaches are small and controlled.
- Neck stays relaxed the whole time.
Safety and Contraindications
Keep the range small and your low back supported. Stop and adjust if pain appears.
- Stop the set if: Sharp low back pain or neck pain starts.
- Use caution if: You have a history of low back irritation.
- Safer substitutions: Dead bugs, floor crunches, side planks.
FAQs
How far should I reach?
Only as far as you can without your low back lifting. A small reach is fine.
Can I do heel taps every day?
You can if the sets are light, but most people do better with 2-4 days per week. Listen to how your abs feel.
Should my head be off the floor?
A small lift is fine, but keep your neck relaxed. If your neck gets tired, rest your head down for a few reps.
Are heel taps good for obliques?
Yes, the side-to-side reach lights up the obliques. Keep the ribs down to feel them more.
Related Exercises
Related Workouts
- No related workouts yet.