How to Do the Resistance Band Bent-Over Row (Form, Muscles Worked, Mistakes)
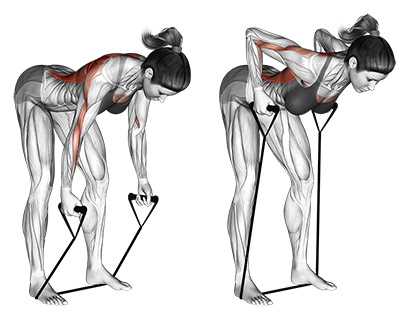
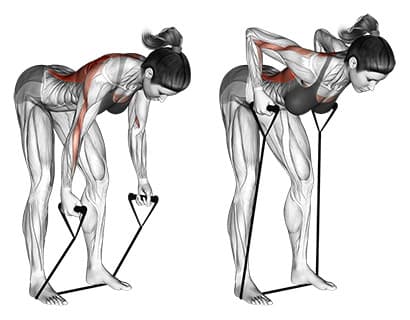
The resistance band bent-over row is a back exercise that trains your lats with constant tension. Anchor the band low or stand on it, hinge and brace, row to the lower ribs, then return slowly without losing tension. It is a great option for home training and warm-ups.
What Muscles Does the Resistance Band Bent-Over Row Work?
The resistance band bent-over row mainly trains your lats and upper back to pull your elbows behind you and control your shoulder blades. Your biceps assist the pull, while your lower back and core brace the hinge so you can keep the torso still while the band tension changes through the rep.
| Role | Muscles | Function |
|---|---|---|
| Primary | Lats, mid traps/rhomboids | Pulls the upper arm back and controls scapular movement against band tension. |
| Secondary | Rear delts, biceps, forearms | Assists the pull and supports grip/handle control. |
| Stabilizers | Lower back, glutes, abdominals | Holds a steady hinge and keeps ribs and pelvis stacked. |
How Do You Perform the Resistance Band Bent-Over Row?
Anchor a band low or stand on it, hinge into a stable torso angle, brace, row the handles to your lower ribs with elbows driving back, then return slowly until arms are straight while keeping tension on the band.
- Anchor: Loop the band around a sturdy low anchor or stand on the middle of the band with feet hip-width.
- Handles: Hold the ends or handles with palms facing each other (neutral grip) as a default.
- Hinge: Push hips back until your torso is stable; soften knees and keep a neutral spine.
- Tension check: Step back (or adjust foot position) until there is tension at the start with arms straight.
- Row: Pull hands toward your lower ribs/upper stomach by driving elbows back.
- Pause: Hold for 1 second and squeeze your lats without shrugging.
- Return: Lower slowly until arms are straight again, keeping tension (do not let the band go slack).
- Repeat: Keep your torso still; if you start rocking, shorten the set or reduce tension.
What Are the Benefits of the Resistance Band Bent-Over Row?
Band rows train the lats and upper back with constant tension and are easy to scale for home or travel workouts.
- Minimal equipment: A single band and a safe anchor can cover a lot of back training.
- Joint-friendly loading: Resistance ramps up smoothly and is often easier to tolerate than heavy free weights for higher reps.
- Great for volume: High-rep sets with slow lowering and pauses build a strong mind-muscle connection.
- Easy progression knobs: Make it harder by stepping farther back, shortening the band, doubling the band, adding pauses, or adding reps.
What Are Common Resistance Band Bent-Over Row Mistakes?
The most common mistake is letting the band go slack and turning the movement into a jerky, momentum-driven row.
Is the band slack at the bottom?
Problem: The first half of the rep feels pointless, then it suddenly gets hard. Why it happens: You are too close to the anchor or the band is too long. Fix: Step back until there is tension with arms straight, or shorten the band.
Are you rocking your torso to create momentum?
Problem: The row turns into a hinge-and-swing and you lose lat tension. Why it happens: You chose too much tension or you rush the reps. Fix: Reduce tension and add a 1-second pause at the top to keep it strict.
Are you shrugging at the top?
Problem: You feel it mostly in the upper traps. Why it happens: You pull up instead of back and let shoulders rise. Fix: Drive elbows back, keep shoulders down, and squeeze lats with a brief pause.
Is your anchor unsafe or moving?
Problem: The setup feels sketchy and you cannot row confidently. Why it happens: The band is attached to something light, unstable, or too high. Fix: Use a sturdy low anchor (heavy post, door anchor rated for bands) and inspect the band for wear before training.
Is the Resistance Band Bent-Over Row Good for Beginners?
Yes. Start with a lighter band, keep your torso angle higher, and focus on slow reps with constant tension. If bracing is hard, do the row more upright (like a standing band row) before progressing to a deeper hinge.
How Much Resistance Should You Use for the Resistance Band Bent-Over Row?
Use the lightest setup that still challenges you at the top while letting you keep tension at the bottom. A good target is finishing sets with 1-3 reps in reserve (RIR) while maintaining strict torso position and a 1-second squeeze at the top.
Progression options (in order):
- Add reps (for example, 10 to 15) while keeping tempo strict.
- Add a longer pause at the top (1 to 2 seconds).
- Step farther from the anchor or shorten the band.
- Use a thicker band or double the band.
| Goal | Sets | Reps | Rest | Effort |
|---|---|---|---|---|
| Hypertrophy | 3-5 | 10-20 | 60-120 sec | 1-3 RIR |
| Technique / activation | 2-4 | 12-25 | 45-90 sec | 2-4 RIR |
How Often Should You Do the Resistance Band Bent-Over Row?
2-4 times per week works well because band rows are easy to recover from and fit into warm-ups or finishers. Use them after pressing days to balance shoulder volume, or pair them with a hip hinge (like RDLs) on lower-body days as lighter back work.
How Does the Resistance Band Bent-Over Row Compare to the Dumbbell Bent-Over Row?
Band rows are easier to set up anywhere and give constant tension, while dumbbells usually offer heavier loading and a more consistent resistance through the whole range.
| Comparison | Resistance band | Dumbbells |
|---|---|---|
| Best use | Home/travel, high-rep volume | Heavier loading and long-term progression |
| Resistance curve | Hardest near the top | More even through the rep |
| Setup | Needs anchor or standing on band | Needs dumbbells |
What Are the Best Alternatives to the Resistance Band Bent-Over Row?
If you want a similar pattern with heavier loading or more support, use dumbbells, cables, or a chest-supported row.
Alternative Exercises


Dumbbell Bent-Over Row
Best for: Heavier loading with simple equipment. Key difference: More consistent resistance through the range than a band. Difficulty: Moderate.
Seated Cable Row
Best for: Smooth resistance and strict reps without worrying about anchoring. Key difference: Easier to micro-load and progress. Difficulty: Low to moderate.
Chest-Supported Row
Best for: Back training when your lower back is the limiter. Key difference: Torso support keeps the hinge out of it. Difficulty: Low to moderate.
Inverted Row
Best for: A bodyweight row that scales by foot position and bar height. Key difference: Uses your bodyweight instead of band tension. Difficulty: Moderate.
What Equipment Do You Need?
- Required: a resistance band and a safe setup (low anchor point or standing on the band).
- Recommended: a door anchor rated for resistance bands and a band with handles for comfort.
- Optional: gloves or chalk if handles slip, and a yoga mat for better footing.
Frequently Asked Questions
Build your plan with Momentum.
Get structured workouts based on your goals, equipment, and training history.